Search for another article…

Node.js is a platform built on Chrome's JavaScript Engine (V8 Engine) for easily building fast and scalable network applications. Node.js uses an event-driven, non-blocking I/O model that makes it lightweight and efficient, perfect for data-intensive real-time applications that run across distributed devices.
This document provides basic guidance on using Node.js with GearHost.
- Change Node.js version
- Enable Websockets
- Debugging Node.js using Kudu
- Installing packages with Node Package Manager
- Recommendations and tips
- Log in to your GearHost Account
- Click on the CloudSite where you want to change Node.js version
- Click the Config tab
- Scroll down to App Settings
- Under App Settings find the row named WEBSITE_NODE_DEFAULT_VERSION or add one if one is not present
- Change the value to one of the supported Node.js versions
- Click the Save Configuration button at the bottom
- Your Node.js version is updated
This option is only available for Hobby CloudSite plans or higher.
- Log in to your GearHost Account
- Click on the CloudSite where you want to enable Websockets
- Click the Config tab
- Over the Websockets menu enable the ON button
The best thing to do would be to use the debug option using Kudu's PowerShell. Here we provide some steps on accessing Kudu. As an example we will proceed with debugging my basic Node.js application.
- Access your Kudu portal, go to Debug Console and select PowerShell
- Navigate to the root directory (/wwwroot/) and run
node --debug yourapp.jsAs shown below you will see that we're missing a module named "express"
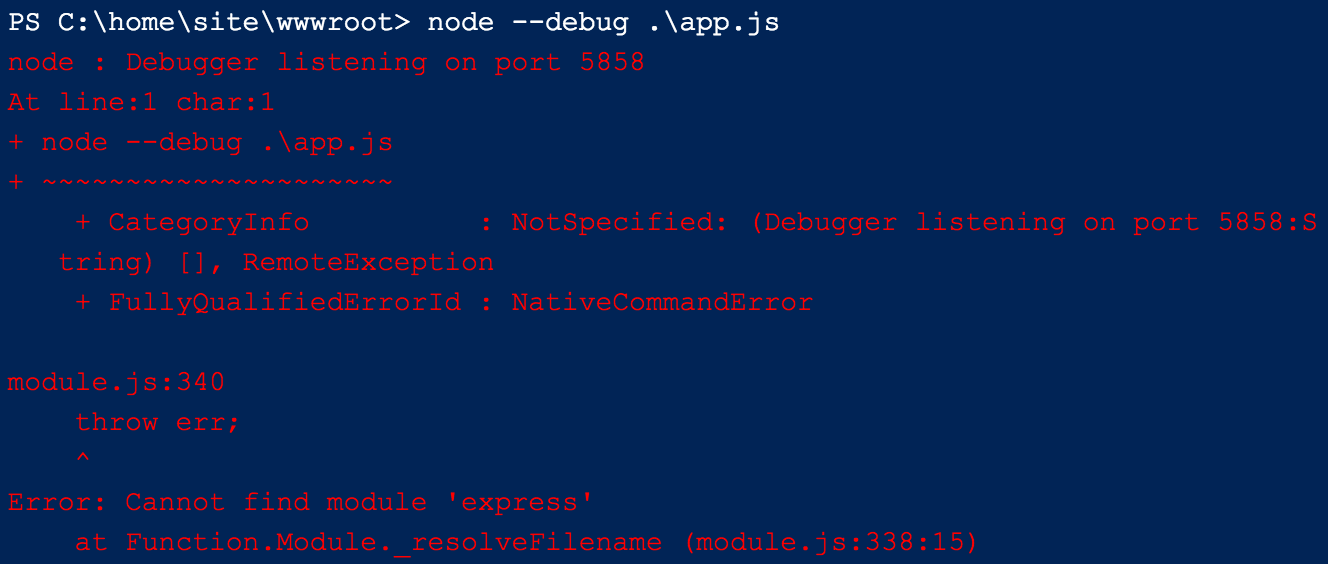
Having a package.json file is useful as it provides the name of the modules required for your app. Using PowerShell, you can install an individual module by running npm install packagename . To make it easier you can simply run npm install and it will install all required modules that your package.json references. After installing the missing dependencies your Node.js application should start working.
You can use a custom web.config file that's commonly used for an Azure environment like ours here. If you're using Visual Studio, please be sure to download NodeJS tools as it's handy for publishing and debugging. We also recommend checking out troubleshooting guides and best practices from Azure's help guide.
Tip: We close all ports by default and only leave ports 80 and 443 open for web server access. This will be an issue if you're trying to debug your application using a custom port via browser. We recommend to debug your application locally or use your Kudu for debugging.
Contribute to this article
Want to edit or suggest changes to this content? You can edit and submit changes to this article using GitHub.